


Pinecone ornament
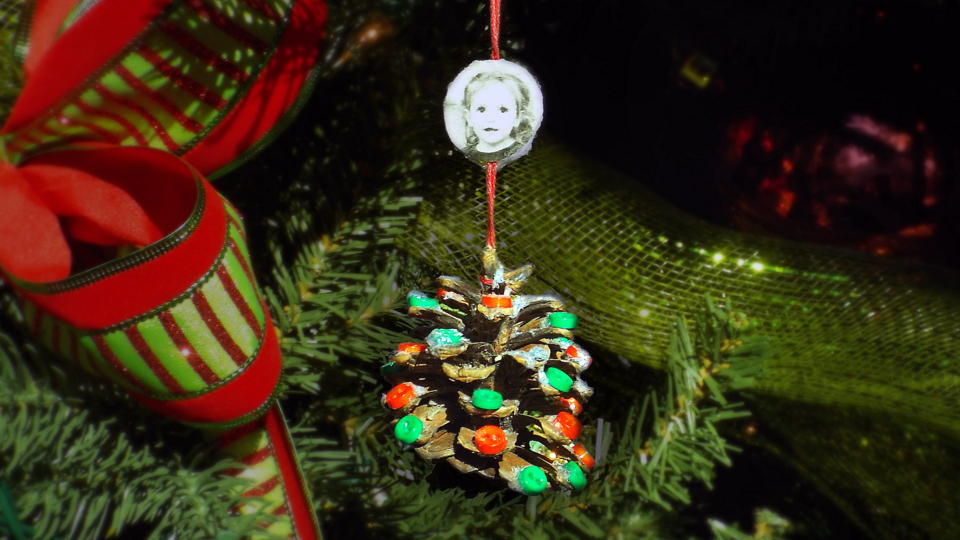
Capture your child's sweetness in this pinecone ornament—it's sure to become a cherished keepsake in the years to come!
You'll Need
- Small pinecone
- Liquid craft glue, such as Tacky
- Inexpensive paint brush
- Small buttons in colors of your choice
- Yogurt top or shallow bowl
- White glitter
- Red embroidery floss
- Photo of your child on cardstock, x2
Time
30 minutes
Learning Stages

Make this adorable holiday craft with your kids this season and enjoy your keepsake through the years.
Setup
Cover the table with a full sheet of newspaper and pour a small amount of thick craft glue onto a plate.
Decorate pinecone ornament
- Have your child paint a dab of glue on top of each petal of the pinecone. If they hold the top petal of the cone with their other hand, it will stay put and not roll around.
- When they have put glue on most of the petals, take the glue away and give the artist a shallow bowl (or the top of a large yogurt container) filled with the little buttons. Using their thumb and index finger, the child places a button on the glue at the end of each petal. Note: Having the buttons on a flat surface with an edge, like a yogurt top, will allow your child to see and choose the buttons without them rolling away or slipping off the table. You might even want to tape the container to the newspaper so it can’t tip over.
- Using a small glitter shaker, give your child a chance to shake the white snow like glitter all over the cone. (Don’t worry if there is a lot of extra glue on the pinecone, this will be perfect for adhering the glittery “snow.”) Since you are doing this project on a sheet of newspaper, it will be easy to gather up the extra glitter in the middle of the paper and slide it back into the glitter bottle.
- Now comes the parent’s part of this project. Fold a 12” piece of embroidery floss in the center. Wrap that fold around the topmost part of the pinecone and tie a knot. This will be the string to hang your ornament.
- Using a quarter or a spool of thread, trace a circle around the face of your child in each of the photocopies and cut out.
- Paint glue on the back of one of the picture circles and place it over the hanging string of the pinecone about an inch above the cone. Stick the back of the other photo onto the first so that the string is sandwiched between the two circles.
- When the glue has dried (about a day), let your child choose the perfect place on your tree to hang their new work of art!
More Like This

The elves' workshop
9 holiday crafts to keep kids busy between rounds of dashing though the snow.
Creativity & Life Skills

Holiday card makeover
Save your holiday cards to make gift tags next year.
Creativity & Life Skills

Spirit of the season
You don't have to tell children it's the holidays. They can feel it in the air!
Personal & Social Skills